Showing posts with label ART. Show all posts
PAPER BALL ORNAMENTS

Are all your holiday decorations out? If you're still wanting to add a little more decor, this simple ornament made from cut out circles is something you might want to try. I went for bright colors, mixed with a little bit of black, gold, and silver, and it's just festive enough. I think these paper ball ornaments are so pretty that I might find a little spot in our house to keep some up all year long!

-cardstock in various colors
-3" circle punch
-ruler
-pencil
-scissors
-glue
-paintbrush
-string/twine


To create the center of the ball, glue ten circles together, but alternate the tip of the triangles pointing up and down. This then connects to the five previous circles that form the top of the ball.


STAMPED INITIAL BRACELET DIY


- gold coin discs (with holes already punched)
- gold chain
- jump rings
- lobster claw closure
- jeweler's bench block
- letter or number punch stamps (I used 6mm size stamps)
- hammer
- tape
- needle nose pliers
- jewelry wire cutters
- rubbing alcohol (70% isopropyl alcohol) and black marker (optional)


Repeat process with each letter until you have all your initials stamped.


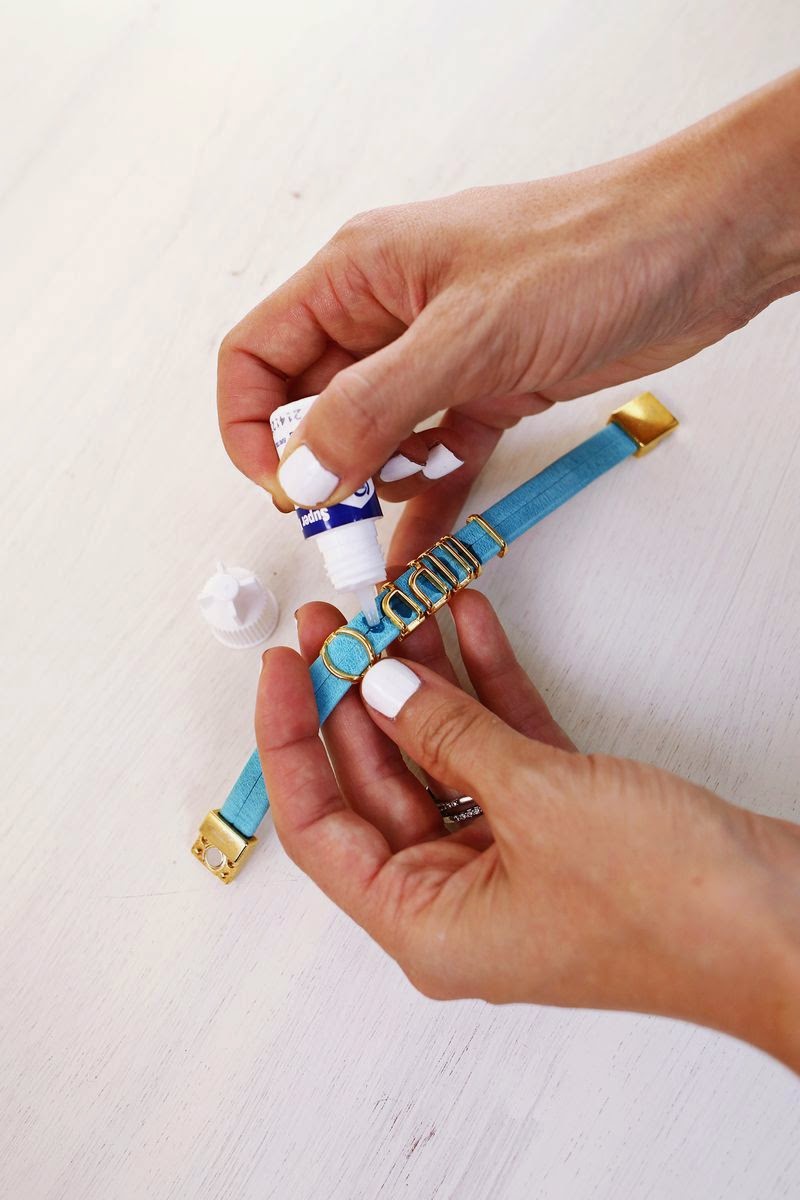
MAKE A PERSONALIZED PHRASE BRACELET


-flat leather (10mm x 2mm) or oval leather (10mm x 6mm)
-letter sliders (I love this font in either 10mm x 2mm or 10mm x 6mm, and they sell hashtags too!)
-magnetic clasp (10mm x 2mm or 10mm x 6mm)
-jewelry glue


Feathers of threads

The issue is, as always in the process of working on the flowers, herbs, or tried to do the branches of thread.
need:
- wire
- thread
- adhesive
- instead of tubes can take any basis for winding. Than it is wider, the greater will be the feathers.
.jpg "Feathers of threads")
Any thread (I have very thin). Only then realized that they can be wound on the line (not necessarily round base), most importantly, that the center "trunk - feather" was in the middle of the base. Wire wrapped with cloth or gafrobumagoy (smeared with glue), after a few turns again smeared with glue (only the place where the wire itself), and in the end also lubricates. Pulls the many threads in a circle (along the base) - that was not even prosvetov.I IMPORTANT: to dry thoroughly (before cutting). I was drying on the battery for half an hour. Cut back side "trunk" (the exact opposite wire) better kantsnozhichkom (scissors is not very convenient.)
.jpg "Feathers of threads")
Dokleivaem top individual tassels (on obratonoy side feathers). Yeah, here's a tip gave klepo4ka after my MC: "In order that would not stick tip, bend the wire in a loop of thread insert beam, screw tip, get a fan of threads." (I think it's more convenient ....)
Cropped lishee scissors - creating a form of writing - your choice.
.jpg "Feathers of threads")
Comb, paint watercolors, glue paetki word on that you have enough imagination. . Once again, small comb comb and sprinkle with hairspray - for greater strength ...

This is an experiment with different thread ... White thread tried in the last turn, then the feathers of them were born .... Until then "tortured" greens)))))
.jpg "Feathers of threads")
You can make these Christmas trees (toy beads I already added in Photoshop)
.jpg "Feathers of threads")
The biggest art installation
Of "light" recently in different parts of the world art installations, we chose seven that truly affect their size. These designs if someone escaped from a bizarre dream where the ball is ruled by large dimensions and unexpected images.
"Revived" Marilyn Monroe
Not everyone's liking campy antics and stereotypical beauty Marilyn Monroe, but deny its role in the history of cinema can only be it not knowledgeable people. Various souvenirs vengeance exploits her name, and numerous imitators do not give sink into oblivion and blond beauty in a specific manner. Remember the famous scene with billowing dress actress in Billy Wilder's "Itch sweat?" Creative sculptor Stuart Johnson recreated frame became a textbook in its amazing Chicago installation "Marilyn forever." Dimensions "revived" Monroe impressive height - 8 meters, weight - 15 tons. Despite the iconic status of the actress and her merits to dreamland, not all locals have approved the construction of an art installation. Blonde no longer in vogue?
Giant striped chaise lounge on UK beach
The idea of this project was born in the minds of marketers of Pimm's, the famous manufacturer of fruit champagne cocktail, and was linked with a move to the UK summer. To implement custom design ideas to life on the beach in Bournemouth was built huge sunbed length of 10 meters and a width of 5.5 meters. Design weighs no less than 6 tons. Author Stuart Murdoch installation seriously expects to get into the Guinness Book of Records: alleges that a sunbed in Bournemouth - the largest in the world. Heraldry of the project is transparent little more than full: fruit cup and striped chaise lounge chair-have long been considered symbols of the United Kingdom, and the placement of structures on the beach is a clear allusion to the population to leave the comfort of their homes and go sunbathing.
"Bad Dog"
Worthy response to the Brussels 'Manneken Pis' prepared American sculptor Richard Jackson. However, in his version of celebrating small need not representative homo sapiens, and the most ordinary dog. Sculpture called «Bad Dog». The location of such provocative works of art - exactly near California Museum Orange County Museum of Art - sculptor chosen by chance: the museum is just an exhibition of his works, and defecate directly onto the wall of the museum dog was part of the general concept of art. Huge size (up to 8.5 meters tall) black labrador void sumnyashesya raises a hind leg and makes her "wet" work. For greater realism from time to time on the wall paint was jetted with a characteristic color. Bust? Richard Jackson thought that did, and the overall success of his show only confirms the idea that true art knows no boundaries.
"Planet Kids"
Unlike dogs defecate Jackson, this sculpture Marc Quinn 2008 totally devoid of irony and can rightly lay claim to being one of the most beautiful and personal art installations of this century. Formally, this sculptural portrait of the son of the seven-month Quinn made truly a giant scale. Judge for yourself: the weight of the sculpture - 7 tons, height - 10 meters. It is an engineering marvel bronze in Singapore tropical park "Gardens by the Bay." Unique design allows virtually invisible backup, whereby a persistent illusion that the sculptor modeled child literally hovers in the air against the backdrop of skyscrapers and is located next to the trees. According to the author of the installation, the cornerstone of its concept was the desire to express the general through the particular love of millions of parents to their offspring by the example of his own son. Not the beauty and love will save the planet?
Fountain "Metalmorfozy"
This large-scale art installation, located in downtown Charlotte, North Carolina, you can watch through a centralized web cams: online broadcasts allow each Internet user to monitor the movement of the sculpture. The very title of the project is easy to detect the pun, but it is easy to reveal nuances in the first turn solid steel head weighing 14 tons, made up of a large number of plates. Its author - famous Czech sculptor David Black, behind which a lot of decent work. "Metalmorfozy" became his first overseas project.
Teddy bear in Manhattan
And from this installation breathes not the technocracy, and somehow captured on a subconscious level, homey feel and atmosphere of a carefree childhood, when best friends were plush toys, and their inability to speak perfectly offset by our irrepressible schoolboy fantasy. The most amazing thing is that it is a miracle yellow weighing 16 tons and a height of 7 meters directly in the center of bustling Manhattan. Seemingly minor detail lamp next to his head slightly slumped Teddy Bears in addition to purely decorative function also performs perfectly practical role: the street lights at night. Made "Teddy" bear made of bronze and stands up to $ 10 million.

Parking-comb
If you buried a fate in Virginia, in the modest town of Roanoke, then surely Find the local landmark - made in the form of a huge comb parking for bicycles, is a vivid example of how sometimes intertwined true art and frightening for their pragmatism and mediocrity life. With probability, close to the maximum, we can say that this comb - the biggest in the world, let her use and away from the traditional. Authors of the project - the designers and sculptors studio-shop «Knowhow Shop LA» - comb cut by hand and simulate hair black steel arc, which serve for fastening comb covered with a strong protective layer. Want to park your bike between the teeth of a comb? Get in the queue, because the number of places is limited to eight, and wishing - rife.
Scheme Weave Bracelet Shambhala: Why are popular and what their meaning
What Lies Shambhala bracelet?
Meaning mascot is already set in the scheme of weaving yarns and is the reflection of the connection between the visible and invisible worlds. It is believed that give amulet bracelet properties by force only masters, for which each node on the decoration has a special meaning. This bracelet gives tranquility vital harmony and luck.
Play a special role beads that weave in jewelry. Shamballa bracelets are often bound to the rocks according to the sign, so it is believed that they may have beneficial effects on human health and with success in business.
Shamballa bracelets can have a variety of colors and combinations of colors. Astrologers have developed a system that allows you to choose the colors of stones to a bracelet according to the individual person's horoscope.
These decorations can equally wear both men and women, as Shambhala have the property to look if you want elegant or courageously.
Since 1994, there is a brand Shamballa, who became the undisputed leader in the art of making bracelets and specializes in creating these ornaments of precious materials.
How do single Shambhala bracelet with their hands
Shamballa bracelets can without difficulty do with their hands, using existing schemes. To create decorations preferable to use natural materials, as they best fit the meaning of the bracelet. This natural stone, metal, wood and leather.
Bracelets can be found among single options where beads are arranged in a circle in a row. Double Bracelet Shambala looks interesting and not much more complicated weaving conventional single decoration. To create a triple bracelet Shambhala , will need to spend more time, since it does not seem to weave a double, but looks very nice and allows using stones of different colors to create unusual designs.
Read also an American - 8 bracelets in Occupational Tatting own hands
Plaiting single bracelet Shambhala must take three cord: short black (60 cm) and two blue cord (length of 120 cm and 60 cm). Also need beads (7 large and 2 smaller).
On the one hand, the black cord form a tight knot.

Stepping back 20 cm from the site, a blue tie cord to the black "in half."

On the main black cord nodules of imposing blue cord.

Unworked several nodes (the number depends on personal preferences), strung on a black cord first bead. Alternate knotting with beads in a predetermined order.

The last node we put a little glue and wait until it dries. Then, cut the excess ends of the cord.

When the main stage of the formation of the bracelet is complete, begin to make the zipper for decoration. To do this, two black tip cord stacked together and tied with knots of blue cord (the principle of formation of nodes is the same as for the bracelet). Doing about 14 knots, glue is applied and then cut off the unwanted ends. As a result of work done black base should move freely through the buckle.

The last step involves making a bracelet hanging on a black bead on the ends of the cord. Cord ends are fixed conventional node that for greater strength bonded with glue and cut the cord protruding edge on the site.

Well, our Shambhala bracelet is ready. If something was not clear - ask questions. I'd be happy to answer them
Subscribe to:
Posts
(
Atom
)


